
B1 Instructions
I. Check Before Use
1. Sign For Inspection
(1) When signing for the new server, please check whether the appearance of the package is damaged. If there is any damage, please take a picture and contact our after-sales service.
(2) After opening the package, please check whether the server case is deformed, whether the fan and connecting cable are damaged, and whether the cable is damaged. If there is any damage, please take a picture and contact our after-sales service.
(3) Please check whether there is any abnormal sound on the server. If there is any abnormal sound, please contact our after-sales service.

The renderings are for reference only, the actual product shall prevail
2. After-sales contact information
(1) Official Website: www.ipollo.com
(2) iPollo Official Wechat Account:iPollo
(3) Facebook:@iPolloMiner
(4) Twitter:@iPolloMiner
(5) E-mail:support@ipollo.com
3. Notes
(1) The server can only be connected to the router or switch by wire.
(2) The ambient temperature during use is recommended to be lower than 30℃.
(3) Pay attention to dust and foreign matter, so as not to corrode the computing board or affect the heat dissipation of the server.
(4) It is recommended to use Google browser or Firefox browser to browse the server background.
(5) It is strictly forbidden to plug and unplug the power cable and signal cable under power. The AC side of the power supply of the server must be reliably grounded.
II. Product Introduction
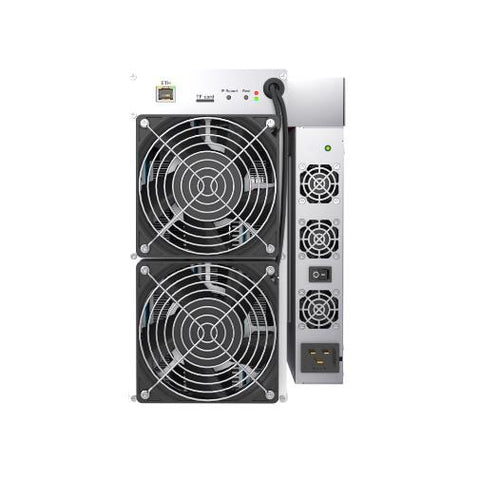
1. Appearance ( The renderings are for reference only, the actual product shall prevail )
Notes
(1) In the process of running the server, please place it as shown in the picture above, that is, keep it flat to avoid any damage to the server.
(2) The socket shall be installed near the server and shall be easily accessible.
(3) The server requires 220V power input to make it work normally. When the server is powered off, the power switch must be turned off first.
(4) For your safety, it is forbidden to remove any screws on the server.
(5) Do not press the metal buttons on the casing.
2. Main Components
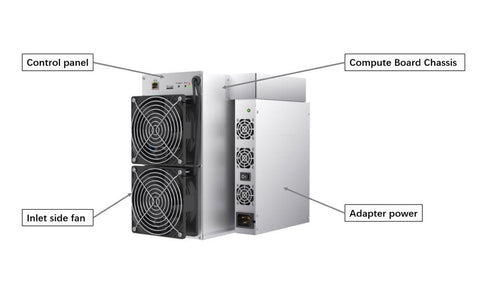
3. Interface Introduction (The renderings are for reference only, the actual product shall prevail )

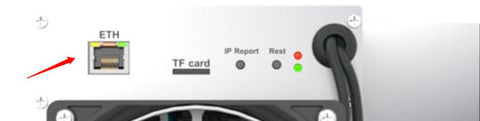
|
TF card |
SD card slot |
|
IP Report |
Use the show IP software to feed back the IP of this server to the computer |
|
ETH |
Network interface |
|
Reset |
Server factory reset button |
|
Fault |
The fault warning light. In most cases, when this light flash, it indicates that a fault has occurred |
|
Normal |
Running indicator light. In most cases, when this light is on, it indicates that the machine is working normally |
III. Use of B1
1. Server Connection
(1) Internet Connection
The interface marked “ETH” on the server interface panel is the network cable interface. Pay attention to the direction when inserting the cable. Please insert the crystal head in place. After inserting it in place, you will usually hear a light “click” sound.
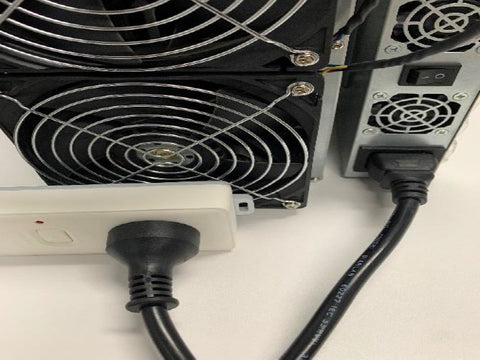
(2) Power Connection
There is a C20 plug of the power supply of B1, and the server can work normally only after connecting a 220V AC power supply.
2. Log in to the Server
2.1 Find the server IP
After the server is powered on and connected to the Internet, it starts to start. After the server’s normal starts to light up, you can find the IP of the server. You can use the “show IP” software to find the server IP as follows:
(1) Download ShowIP software: http://www.nano.cn/download/ShowIP.exe
(2) Double-click “show IP” to open the software.
(3) Short press the “IP Report” button on the server for 1 second and release it.
(4) The server IP information is displayed on the tool window, as shown below:

Note: The server and PC must be in the same network segment, otherwise the IP information returned by the server cannot be received.
2.2 Enter the Server Backstage Management System
(1) After finding the IP of the server, enter the obtained IP address in the browser (Google is recommended), press Enter to enter the server login interface:
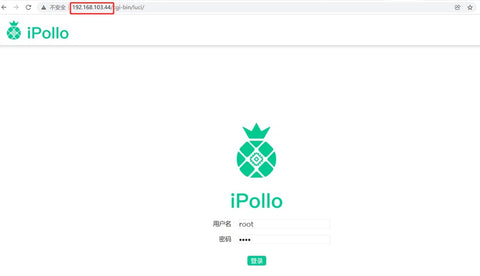
(2) After entering the username and password on the login interface (the username and password are root by default), press “Login” to enter the Server Backstage Management System.
3. Server Settings
3.1 Fill in the Mining Pool Information
Note: This manual takes viabtc mining pool as an example: https://www.viabtc.com/
Btc mining address 1: stratum+tcp://btc.viabtc.top:3333
Btc mining address 2: stratum+tcp://btc.viabtc.top:25
Btc mining address 3: stratum+tcp://btc.viabtc.top:443
(1) Click “Miner Configuration” to enter the mine pool configuration and hardware configuration page.
(2) “Address” shall be filled with the mining link address of the BTC mining pool, which can be found in the corresponding currency of the mining pool.
(For detailed methods, please refer to: https://www.viabtc.com/pool/state)
(3) “Miner” and “ipollol1” are the “sub-accounts” set in the corresponding mining pool account, and the number suffixed with “.001” is the number used to distinguish the server.
(For detailed methods, please refer to: https://www.viabtc.com/setting/account)
(4) The password does not need to be changed (the default is sufficient).

Note: In order to prevent “Pool1” from being disconnected, causing the server to not work, it is recommended to set “Pool2” and “Pool3” at the same time, so as to ensure that the system will automatically switch to “Pool 2” or "Pool 3” for normal operation when “Pool 1” goes offline.
3.2 Network Settings
(1) Click “Miner Configuration” to enter the server network configuration page.
(2) In the protocol column, select one of “DHCP (dynamic)” or “Static” (optional).
(2-1) Select “DHCP (Dynamic)” State
(a) Select the “DHCP (dynamic)” state.
(b) Select "Save&Apply", it will take effect after page buffering is completed, and the modified information will take effect. End here, the configuration of the server has been completed, congratulations on your becoming a miner.

(2-2) Select “Static” State
(a) Enter the IP address, netmask, gateway, and DNS-Server in turn in the four boxes below.
(b) Then click “Save&Apply”, it will take effect after the page buffering is completed. The configuration of the server has been completed, congratulations on your becoming a miner.
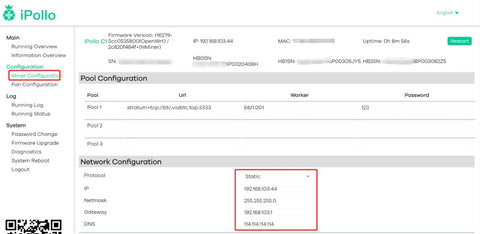
Image (Static)
3.3 Login Password Modification
(1) The server is powered on and connected to the network.
(2) Through the browser, enter the server IP, account and password login information in turn to enter the server web page background, and click “change password”.
(3) Enter the new password.
(4) Enter the modified new password again, and then click below to save and take effect.

Note: The ViaBtc mining pool is used as an example. If you use other mining pools, please modify the address of the mining pool you want to use, and refer to the corresponding mining pool operation instructions.
IV. Important Notice
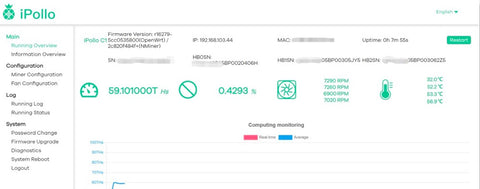
1. After the machine is running normally, please use the "24-hour hashrate of the mining pool" as the criterion for stability.
2. It is recommended to use the original standard power supply to avoid damage to the machine or safety accidents.
3. Try to use the original standard power supply to suppress the voltage shock at the moment of power-on.
4. Please be careful not to spill water or other liquids on the machine, especially the non-case parts.
5. Please pay attention to ventilation and heat dissipation, do not block the vents, and do not place on flammable materials and fabrics.
6. If you need to disassemble the case to check the problem, please contact customer service support first. If you open the case without permission, the warranty will be voided.
7. This device is not for family consumption. This device shall be operated only by professionals, and nonprofessionals (such as underage person, ) are not allowed to operate this device. In case of breaching this notice, the breaching person shall be responsible for any loss or damage caused to others or himself/herself.8. You shall be liable for any loss or damage caused to yourself arising from or caused by algorithm change of block-chain itself or the device’ algorithm change made by you. In such case, the device will not enjoy the official warranty service and will be treated asout-of-
warranty.
9. All final interpretation rights of this product are reserved by Ipollo HK Limited.