
X1 Instruction
Server Setup Manual
|
Content |
Parameter |
|
Model No |
iPollo X1 |
|
Crypto Algorithm /coin |
Ethash/ETHW、ETF、ETC |
|
Hashrate(MH/s) |
300(±10%) |
|
Operation temperature(℃) |
10-25 |
|
Power consumption(W) |
240(±10%) |
|
Memory |
Design memory-6 GB, available memory-5.8 GB |
- X1:Check Before Use
- Sign For Inspection
- When signing for the new server, please check whether the appearance of the package is damaged. If there is any damage, please take a picture and contact our after-sales service.
- After opening the package, please check whether the server case is deformed, whether the fan and connecting cable are damaged, and whether the cable is damaged. If there is any damage, please take a picture and contact our after-sales service.
- Please check whether there is any abnormal sound on the server. If there is any abnormal sound, please contact our after-sales service.

- After-sales contact information
- Official Website: ipollo.com
- Official Wechat Account:iPollo
- Facebook:@iPolloMiner
- Twitter:@iPolloMiner
- E-mail:support@ipollo.com
- Notes
- Recommended ambient temperature range: 10℃-25℃.
- The hashrate is subject to the 24-hour hashrate of the Mining Pool.
- Pay attention to dust and foreign matter, so as not to corrode the computing board or affect the heat dissipation of the server.
- It is strictly forbidden to plug and unplug the power cable and signal cable under power. The AC side of the power supply of the server must be reliably grounded.
Ⅱ、X1: Product Introduction
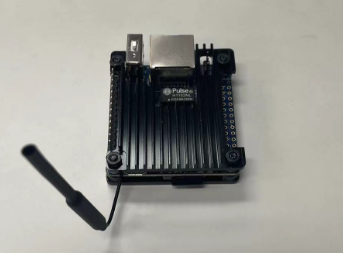
- Main Components

(1)“1”:power cable;
(2)“2”:USB-Type B cable
(3)“3”:X1
(4)“4”:power adapter(the pictures are for reference only, please refer to actual products.)
- Interface Introduction

1 power interface
2 Running indicator light. In most cases, when this light is on, it indicates that the machine is working normally
3 Type-B interface
- Notes
- The two 8PIN power ports must be connected at the same time before supplying power.
- This product requires a power input of 100~240VAC to make the product work normally. When the server is powered off, the power switch must be turned off first.
- For your safety, it is forbidden to remove any screws on the server.
- Do not press the metal buttons on the casing.
Ⅲ、X1: Use and Configuration
- Server Connection
Currently, the device just supports Windows 8/Windows 10/Windows 11, 64 bit system
- Power Connection
X1 dedicated power supply has two 8PIN DC outputs, and the input of the power supply is 100~240V AC. The server can work normally after confirming that the connection is good.

(2)Internet connection
- USB-Type Bconnection
Use USB Type B cable to connect the server Type B interface, and connect the other end to the Windows system computer USB interface

- Installation tools(X1 tool)
2.1. Installing the Drive
Install the specified driver (CH341PAR) as follows:
(1) Download X1 tool compressed package
(2) Decompress the X1 tool package and find the driver file: CH341PAR
(3) Decompress the driver compression package and open SETUP, as shown in the following pic;

(4)click installation, as shown in the below pic

(5)Installation finished, as shown in the pic

2.2、Trust Tools
- Enter Windows Security

- Click Virus & Threat protection

- Enter the above page, then click manage settings

- Find Exclusions, then click add or remove exclusions

- Click Add an exclusion, a menu will pop up, then click folder

- Find the folder of the X1 tool, select the folder, and then click Select Folder

- Successfully trusted the folder and added X1 tool to Exclusion

3、Run X1 tool
(1)running overview
You can view real-time hash rate, rejection rate, fan speed, and chip temperature

(2)information overview
You can view information such as running time, average hash rate, and miners in the mining pool that have been running

(3)Miner configuration
Note: This manual takes the “poolin” as an example.
ETC mining address: stratum+tcp://etc.ss.poolin.one:443
(1)Select "Pool Configuration" and fill in the Mining Pool Information
(1-1) The "Url" in "Mining Pool 1" is filled with the ETC Poolin mining link address: stratum+tcp://etc.ss.poolin.one:443
(1-2) "Worker" in "Pool 1" fill in "ipollomini.001"; "ipollomini" is a custom "sub-account" in the corresponding Mining Pool account; the number suffixed with ".001" is the number used to distinguish the server;).
Note: For customization such as numbers or letter combinations, use English periods to separate them, please only modify the corresponding characters, and do not increase or decrease spaces and punctuation)

(4)Fan configuration
The default is auto control, which automatically adjusts the temperature based on the chip temperature

(5)System
Click restart to restore the server to its factory settings

Note: After the device is powered off and restarted, please reopen the X1 tool to connect the device with PC.
Ⅳ. Orange Pi Usage and Settings
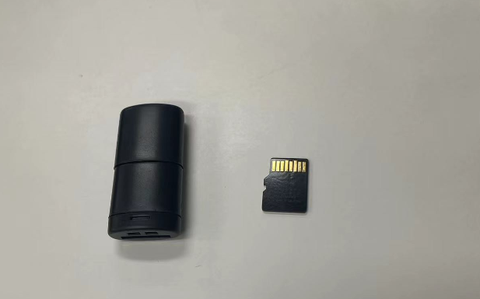
- Connect Orange Pi
(1) Insert SD card into Orange Pi
(2) Connect the power adapter and network cable
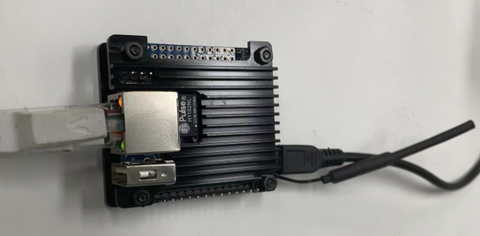
(3) Connect USB port for USB-Type B cable

- Obtain IP address
After the Orange Pi is powered on and connected to the network, it begins to run. Wait for 3-5 minutes to locate the IP address of the Orange Pi. Open the router back end or use the showIP software to find the server IP. The showIP software method is as follows:
(1) Download software: https://ipollo.com/pages/tool
(2) Double click on 'showIP' to open the software;
(3) Feedback server IP information on the PC, as shown in the following figure:
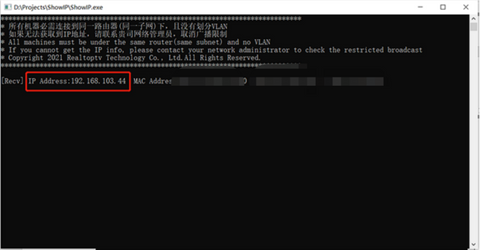
Note: The server and PC must be in the same network segment, otherwise IP information feedback from the server cannot be received.
- Set Orange Pi
Enter the server management background
(1) After finding the IP address of the server, enter the obtained IP address in the browser (preferably Google), press “Enter” to enter the server login interface, and enter the default administrator account and password: root

(2)Press “Login”to enter the server management background as follows:
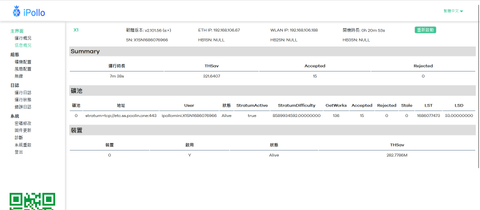
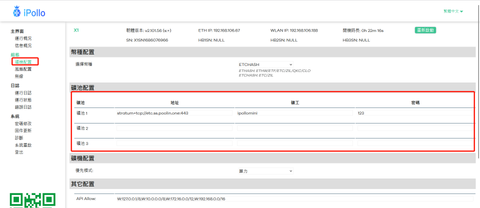
(3)Server Settings
Click on the "Miner Configuration" interface of "Configuration" to set up "Mining Pool" and "Network"

(3.1) Filling out the information of the mining pool
Explanation: This manual takes "Poolin" mining pool as an example, and ETHW mining address is stratum+tcp://ethw.ss.poolin.one:443
- Select “Miner configuration”and fill in the miningpool information
- The "Url" in "Mining Pool 1" is filled in as ETHW Poolinmining link address: stratum+ tcp://ethw.ss.poolin.one:443
- Fill in "ipollomini. 001" for "Miner" in "Worker1" ("ipollomini" is the customized "sub account" in the corresponding mining pool account; the suffix ". 001" is the number used to distinguish servers).
Note: Customization such as number or letter combinations should be separated by English periods, and only the corresponding characters should be modified. Do not add or subtract spaces or punctuation.
Note: To prevent "Mining Pool 1" from being disconnected and causing the server to not work, it is recommended to set "Mining Pool 2" and "Mining Pool 3" simultaneously, which can ensure that in the event of "Mining Pool 1" being disconnected, the system will automatically switch to "Mining Pool 2" or "Mining Pool 3" for normal operation.
(3.2) Network Settings
- Select “Miner Configuration,”find network configuration and fill in the network information:
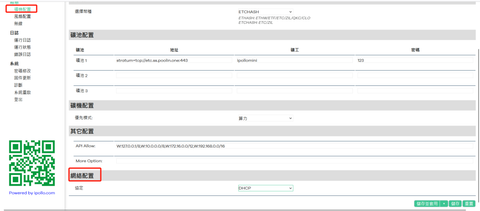
- Select either "DHCP" or "Static" in the "Protocol" column (optional);
- Select "DHCP"(dynamic)status: Server automatically obtains IP address
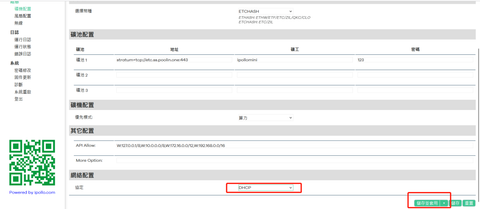
After setting up, click "Save and Apply", the system will save and automatically restart to take effect, and the server will start running normally
Then the server configuration is complete. Congratulations on becoming a miner.
- Select the "Static" status
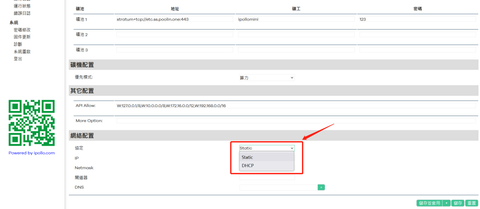
Enter the IP address, subnet mask, gateway, DNS server in the following four boxes, and then click "Save and Apply"
Ⅴ. Orange Pi firmware update
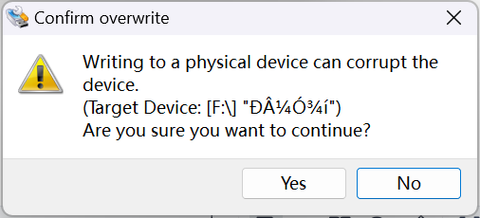
(1)Insert the SD card into the card reader and connect it to a computer
(2)Open the win32diskimager tool (download address on the official website:https://ipollo.com/pages/tool )

(3)Choose Orange Pi Firmware

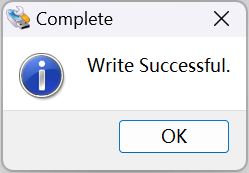
(4)Click Write to start burning, click 'Yes' to confirm burning
(5)Burn successfully
Ⅴ、Important Notice
- After the machine is running normally, please use the "24-hour hashrate of the Mining Pool" as the criterion for stability.
- It is recommended to use the original standard power supply to avoid damage to the machine or safety accidents.
- Try to use the original standard power supply to suppress the voltage shock at the moment of power-on.
- Please be careful not to spill water or other liquids on the machine, especially the non-case parts.
- Please pay attention to ventilation and heat dissipation, do not block the vents, and do not place on flammable materials and fabrics.
- If you need to disassemble the case to check the problem, please contact customer service support first. If you open the case without permission, the warranty will be voided.
- This device is not for family consumption. This device shall be operated only by professionals, and nonprofessionals (such as underage person, etc) are not allowed to operate this device. In case of breaching this notice, the breaching person shall be responsible for any loss or damage caused to others or himself/herself.
- You shall be liable for any loss or damage caused to yourself arising from or caused by algorithm change of block-chain itself or the device’ algorithm change made by you. In such case, the device will not enjoy the official warranty service and will be treated as out-of-warranty.